How to Speed Up Installing Kitchens: Pro Tips to Fit Faster
Here’s a practical, trade-focused guide to speeding up kitchen installation - from set-up and workflow to modern fixing methods that cut out wasted time. These tips are based on real installer practice and are designed to help you finish faster with a cleaner result.
Anyone putting in a kitchen for the first time will know how daunting it is. You first open up those flat-pack packages and brood over them. How do all the components fit together to make anything like a kitchen cabinet?
Time for a cuppa and some avoidance. Kettle on and launch into a conversation with our nearest and dearest. Mother-in-law’s impending visit. The kids’ current school project. Clean out the gutters. Anything to avoid the daunting prospect of putting these confounding jigsaws together, before we even attempt the all-important task of attaching them to the walls.
Faced with such an onerous task, most of us will appreciate any tips on kitchen cabinet installation. First we have to understand how the kitchen cabinets themselves are actually fitted together.
As a starting point what we need is a step by step guide to fitting all the components together!
This usually comes in the form of an accompanying diagrammatic booklet, written in several different European languages. The most prevalent of which often seems to be Double Dutch.
Over the years I have inflicted kitchen cabinet assembly upon myself several times. I should have had a swear box ready to hand. A sizeable amount of money would be in it by now. Enough, for sure, to pay a professional next time.
So when faced with dozens of cardboard packages where do you begin? I’ve learned over the years and here’s my step-by-step guide.
Ready to start installing kitchens? Let’s get going!
Do This First: The 5-Minute Set-Up That Saves Hours
- Create a clear assembly zone (old towel/workbench “safe zone”) plus a labelled parts area.
- Stage tools and batteries (drivers, bits, charger, spare batteries at arm’s reach).
- Batch open boxes for the first unit only; keep others sealed to avoid part mix-ups.
- Sort small components into tubs (hinges, cams, screws) before starting.
- Confirm datum lines and services (highest floor point, studs, utilities marked).
Five minutes here typically saves 20–30 minutes per run of units.
1. Sort through all the kitchen cabinet boxes
Tip: NEVER open more than one set of boxes at a time. Construct your first unit and then only move on to the next when finished. It avoids wasting time and so much unnecessary frustration.
Often the individual components which make up each separate kitchen cabinet may not be in a single large box. Likely they are in half a dozen or so smaller packages.
Want to save a great deal of time and energy in the long run? Before you even open a single box take the time and trouble to identify which boxes go together. Place them in separate piles.
Space is essential. Whether you are undertaking the work in a new-build space or in a gutted old existing kitchen, you want to be working in an empty room.
Identify a wall which will not be part of your new kitchen plan. Line the boxes up in separate piles, with each one corresponding to an individual kitchen cabinet.
If you don’t have space to do this in the kitchen, a good alternative is to use the hallway. It can be ideal: a long, narrow passageway to line the boxes up starting with the unit you will be making up first.
2. Gather together the required tools
Before you even start, gather together all the tools that you are likely to need. Make sure that you have screwdrivers with an assortment of different heads.
It never ceases to amaze me why kitchen manufacturers find it necessary to use such a variety of heads in an individual unit. I presume they are working on a commission basis with screwdriver manufacturers!
Needless to say you will be using power tools to construct your units. Give them a health check before you start. Make sure they are well charged. In essence, get everything set before you start. That’s a great way to speed up your kitchen cabinet installation.
3. Compartmentalise small components
A word of warning here. Don’t reach for the Stanley knife and slice through the tape. You may cut into the surface of one of the components of your new kitchen cabinet in the process. Open the box, but always do so carefully.
You will find piles of small fixtures and fittings. Open the cellophane packaging with care. Seldom are they pre-sorted. They are often very alike to look at, but each with a different function. Getting this right will save you time.
Sort through them, segregating the different parts and placing each in a separate small container. Old takeaway cartons can be great. Check that you have the requisite number before you start assembly. It’s very frustrating to get halfway through and discover you are fixtures short. A big time waster.
4. Find yourself an old bath towel
No, this is not to mop your fevered brow due to the stress of putting in kitchen cabinets. It’s to lay out on the floor or on top of your raised workbench. That’s your “safe zone”. Make sure never to leave a metal fitting laying around on top of it. An indentation on the “good side” of the next cabinet you are putting together will cost you.
5. Read the kitchen cabinet manufacturer’s instructions
Spend a few minutes familiarising yourself with the sequence of necessary tasks. Get this wrong and time is going to be wasted.
Get one simple operation out of sequence and it may mean your unit will never fit together. Taking the whole thing apart and starting again from scratch is horrid. Unbuilding is such a waste of time and so frustrating.
Do not imagine that you know best. The manufacturer will understand how it all fits together far better than you will. It takes them years to plan and design these cabinets. Trust the instructions; there is rarely an easy shortcut to getting it right.
Print on the instruction sheets on the small side? If, like me, you rely on reading glasses, make sure to have your spectacles to hand.
6. Get the hang of it
Remember that the first cabinet you put together will take longer than the rest. Start with small simple units. Single base cabinets are best. Work your way up to the more complicated corner cabinets with carousels.
Most cabinets construct in a similar manner. Understand the basic principles and you’ll whistle through much more easily. As well as digging into your pocket far less often to add to the swear box.
Cut down the frustration and speed up your fit.
7. Set yourself a goal
Don’t do too much in one go. Remember that “Rome wasn’t built in a day” and nor is putting your new kitchen together ever going to be completed in 24 hours. Start the job on a Saturday morning and you are not going to be cooking tomorrow’s Sunday roast in your new oven.
Plan to eat out, or at least make sure that you have the menus for a nearby takeaway to hand. Forget the washing up too. You are not likely to have your new kitchen sink plumbed in and ready to use by the end of day one. But don’t forget you do have water in the bathroom. If the dirty dishes are beginning to stack up, they can always get a soak in the bath, or even join you in the shower.
8. Take time to save time
Needless to say, you will want the job finished as soon as possible. But take time to think and plan. A detail like raising the base cabinets up an inch can save masses of plinth trimming. Always think ahead.
Avoid another classic mistake.
Get the cooker hood height set right. Raising the height of an extraction hood by an extra inch or so may have a result - that you’re not forever bumping your head on it whilst cooking on the hob.
Have the tiles you are planning to use to hand and measure the amount of space they need. Allow for worktops and set the correct space between work surface and wall cabinets.
Get it so that the space between the work surface and the wall cabinets equals the tiles, including grout. This will save a whole heap of tile cutting and give you the best looking finish.
9. Think of the purpose for each cabinet
Decide what kitchen items you will be storing in each of your cabinets. Sort this before you set about installing the shelving. Then you won’t find yourself changing them later.
Moving those annoying little pegs up and down is frustrating and can cause breakout. It’s an irritating job, so get it right first time.
10. Enlist some help (before putting in kitchen cabinets)
Make sure that there is somebody there to help. Don’t believe those film clips found on YouTube where an individual works alone at a snail’s pace but seems to finish in less time than it takes to prepare an evening meal.
There are always going to be tasks which need a second pair of hands. Even if it is a simple case of having someone to hold something in place. A good helper will perform an essential part of the construction and can be a godsend.
A few words of encouragement from your assistant, a bit of moral support and someone else to put the kettle on and make you stop can make all the difference.
So where do we begin?
Here are our Top Kitchen Installation Tips to make sure that your new kitchen goes in a treat.
Installer Speed Checklist (At a Glance)
- Stage boxes by unit; open one unit at a time
- Pre-sort fixings; prep drivers/bits and spare batteries
- Mark datum lines; identify studs/solid fixing points
- Assemble simple units first; batch repeat steps
- Use adjustable spacer fixings for base-to-wall fastening (faster than L-brackets)
- Once you have received your kitchen, check that all the parts are there and in good condition. Be wary of any damaged packaging, which may conceal sub-standard contents. Have your order list to hand and check everything off.
- Only dismantle your old kitchen once you have all your new parts and appliances. Missing parts cause lengthy delays.
- Always store your kitchen parts and new worktops indoors. Allow them to acclimatise to normal room temperature and humidity.
- Begin removing your old kitchen. Make sure that the electricity, water and gas are all turned off before you start. Always use a qualified professional to deal with supplies.
- Once you have removed your old units, prepare your room. Now is the right time to do all your making good. Prime and paint your walls. Install any new floor tiling if you want it to run under your units.
Marking out cabinet positions
-
Make a drawing of the layout of your new kitchen on the wall.
Check that everything fits with the measurements from your plan. Check that the services are where you need them. -
Survey your empty space by checking the square of your corners and that your walls are plumb.
Note the highest point of the floor and anywhere that the corners are not square. -
Double check that your wall is strong enough to hang your kitchen cabinets.
It is best to install your fixings into a stud or a support beam. An electronic stud finder can be helpful. -
In most kitchens it’s best to install your wall cabinets first.
This will allow you to work and move around without the base units getting in the way. -
One exception is a single-line kitchen with a high cabinet at one end.
In this case install the high cabinet first. Tall housings will often govern the height of wall units. -
Before you begin, mark the location of all plumbing and other utilities.
Some cabinets have ready-made openings. If necessary, create your own apertures before fitting the cabinets. -
Assemble all the wall cabinet frames and use those instructions.
Wait until later before fitting drawers, doors and internal fittings. -
Hang the corner cabinet first before hanging the remaining cabinets.
Hold off tightening the fixings until the base cabinets are in place so you can ensure alignment. -
Assemble all the base cabinets according to the assembly instructions.
Attach the legs and build them in the correct order, i.e. the order you want to fit them. -
Having identified the high and low point in the floor - use it.
Make sure the base cabinet height is right to avoid trimming all those plinths. - If you are installing a corner carousel, now is the time to place it inside the cabinet.
-
Make sure that the correct base cabinet aligns with your wall cabinets.
Check that each cabinet is level and aligned with the previous one by fine-tuning those legs. Be mindful you don’t undo your survey and bring the units down too low. - If you have a tall housing, don’t forget to add its décor panel before installing adjacent units.
-
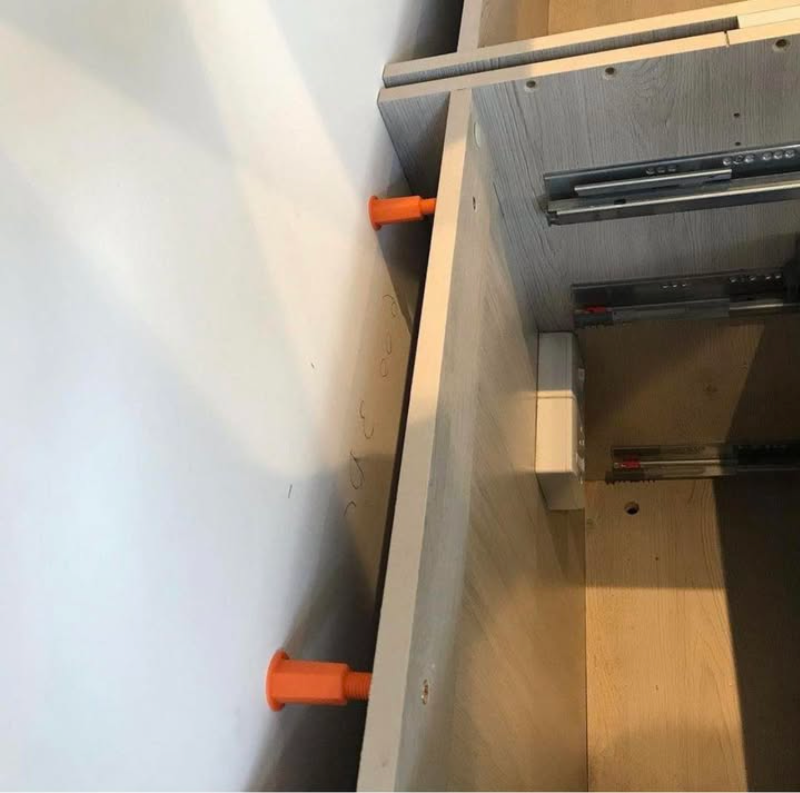
Avoid using angle brackets (L-brackets).
They are fiddly and difficult to access in tight voids. Personal disclaimer: I invented the Space-Plug Adjustable Spacer Fixing to replace the angle bracket. I’m proud to say professional carpenters are using them to fix base kitchen cabinets to the wall - available to purchase from my online shop. -
Use filler pieces between your cabinets and walls.
They give that fitted look to the whole kitchen and provide clearance for protruding handles. If a cabinet is too close to a wall the door may not open fully. -
Check your walls using a spirit level.
If the wall is even and square, fillers are a simple task of measuring and cutting. -
If your wall is not level and flat, the filler piece must be scribed to fit the wall’s shape.
Use a filler piece, measuring tape, a small block of wood (about 3 cm thick) and a pencil - or invest, like the professionals, in the U-Scribe Jig (also available in my online shop).
Professional Tips & Products To Speed Up Installing Kitchen Cabinets
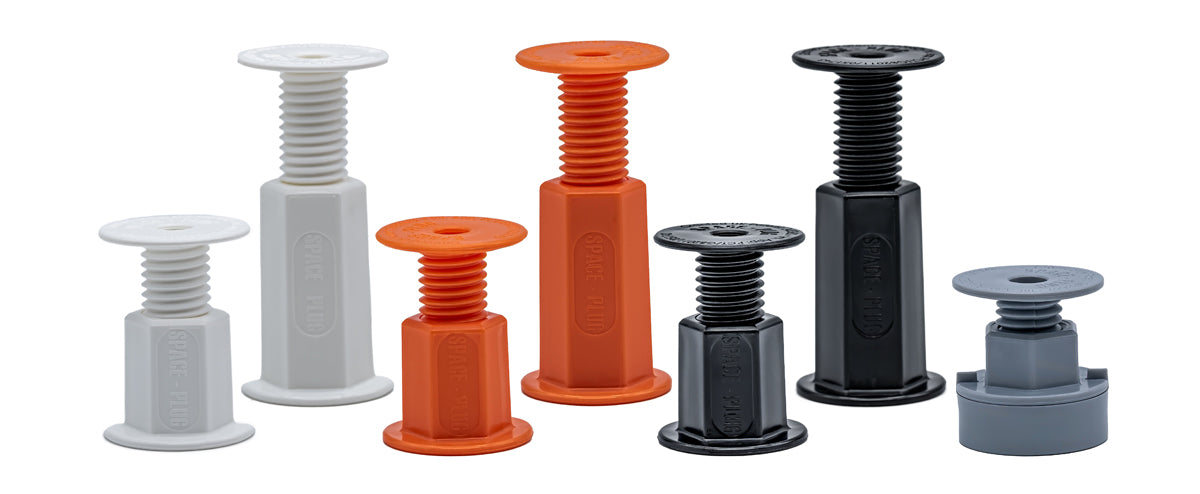
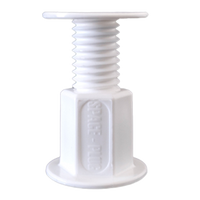
Use “Space-Plug” Adjustable Spacer Fixings
The fast way to attach your base kitchen cabinets to the wall. These are still new — even some professional kitchen fitters may not be aware of them. But this particular installation tip is a no-brainer: fast, simple, accurate and professional.
See what our friend, Gosforth Handyman, has to say and see how the Adjustable Spacer Fixing works:
I used to absolutely hate fixing base units to the wall. Those little brackets were always in the wrong place, awkward to screw in, and half the time the wall didn’t even play ball. Fixing your units to the wall is important - it stops movement, keeps everything in line, and makes the whole kitchen feel solid. Then I tried Space-Plug. Total game-changer. Now I just pop them where I want, adjust to the gap, and job done. Solid as a rock - and way quicker too. I’m never going back.
Tom Easter, ‘On The Tools’ Kitchen Fitter of the Year 2022 & 2024
Fix Base Units Faster: Adjustable Spacer Fixings vs L-Brackets
Traditional L-brackets (angle brackets) can be fiddly and slow in tight service voids. A modern approach is to fix directly through the cabinet back into the wall using adjustable spacer fixings. It’s quicker, cleaner and more precise.
Learn more about the smarter alternative to kitchen cabinet brackets, or explore adjustable fixings used by professional installers.
These fast, simple and professional adjustable spacers are now sold worldwide. Invented by me, Cliff Petit, a former kitchen fitter. I have reached sales of over 11 million units to date. I found myself slowed up, yet again, putting in kitchen cabinets by the fittings manufacturers supplied. It was then that I had a light-bulb moment and came up with the solution to this age-old problem.
In 2013, the Adjustable Spacer Fixing was born and I set up selling my new invention through my (then) new company, Space-Plug.
With its great flexibility, Space-Plug’s Adjustable Spacer Fixings proved to be an ideal problem-solver. Anyone putting in kitchen cabinets should have Space-Plug Adjustable Spacers to hand.
Drill straight through the cabinet and into the wall behind. No need to move a unit. It’s fast and accurate. You usually only need one per cabinet, which makes them even faster. Put your wall plug in. Thread your screw and locate. Unwind your Space-Plug to fit and tighten up. Job done.
It is as simple as that and will speed up your kitchen cabinet installation no end.
To buy either Space-Plug Adjustable Spacer Fixing or U-Scribe Jig, visit the Space-Plug Shop.
What is “Scribing”?
Scribing is the process of shaping a piece of wood exactly to the wall. If you haven’t done it before, it’s YouTube time for real this time. There are some great simple videos that take you step by step on how to trace the wall shape onto your filler piece. There are an array of pencil holders and tools to help with this job. We like to use an invention that a fellow inventor came up with, named U-Scribe Jig. A block of wood or a pair of compasses will do the job though.
Here is a simple explanation on how U-Scribe Jig works:
Once you have traced the shape of the wall onto the filler piece, cut along your trace line. Place the new cut edge of the filler piece against the wall and it should fit a treat. Trim it top and bottom. To support the filler piece in place use a batten to the wall and holes through the sides of the cabinet. When all your filler pieces are in position, caulk will give that final finishing touch. Finally, if you are installing a kitchen island it’ll be the last build. If it’s not floating on castors fix it to the floor. Create a batten frame for it to sit on. Fasten the frame to both the floor and the cabinets.
Be careful. Floors have electricity, heating pipes, etc. in them just like walls. When attaching the frame to the floor be aware and use your stud finder here too.
Ready to learn more? See how Space-Plug replaces old-style L brackets with a faster, cleaner fixing method for base units. Discover Space-Plug and enjoy 10% off your first purchase - plus free shipping with code FREESHIP at checkout.
I’d very much like to see you become a Space-Plug Fixologist. By joining the Space-Plug mailing list, you’ll receive a 10% discount on your first order through the Space-Plug Shop. I’ll also share stories and tips from other Space-Plug Fixologists who are changing the way they install kitchens.
Registration Form To Become A Space-Plug Fixologist
MD of Space-Plug Ltd
Cliff Petit